Sunday 30 September 2012

DPP - Exercise - Colour cast and white balance

DPP - Exercise - Colour cast and white balance

Well here I am reading the detail of the exercise, to look out of the window to see it pouring down with rain AGAIN!  Thinking I should be in a warmer climate to study for this :-(  So I have decided to do some research first and see if the sun decides to make an appearance)!

Research:
 
All Digital cameras have a menu for the WB icons similar to that shown below.
This image has detailed notes about the settings.
 
The system used for correcting colour temperatures within the camera is called white balance, this is so because the white areas are simply the easiest tones to find and are the ones that closely reflect the natural colour of the source of the light, this therefore helps to avoid colour casts within the images.

[online image] http://www.bltdirect.com/lampColourTemperatures.php Accessed on 26/09/2012


What the eye sees is neutral light, as the brain has the ability to neutralise this, whereas the camera doesn't and will only capture what it sees. The wrong WB setting will lead to unflattering images, however post production software can be used to alter images.

AWB - Auto White Balance will not always do your photography justice as in some situations it will not support the light. Hence the reason to adjust the different settings for the various lighting conditions.

Light may appear blue in the shade or a reddish colour at sunrise and set and can also be affected by coloured surfaces ie: painted walls!

However, you can also use the WB setting to your advantage when opting for creative images.
EXERCISE: Colour cast and white balance
 
PART 1
Find the following outdoor lighting situations each of which has a different colour temperature.
 
  • Sunlight
  • Cloudy
  • Open shade on a sunny day
  • AWB

Choose a scene, object or person to photograph, shoot 4 versions using each of the white balance settings.

Compare the images taken.

Quick the sun is out - albeit not strong but out all the same.


The well behaved model!
 
My model in sunlight.

WB: AWB

 
WB: Sunny

WB: shade
 
 WB: Cloudy


My model - cloudy:
 
WB: AWB

WB: Sunny

 
WB: Shade
 
WB: Cloudy


 My model: - Open shade on a sunny day
 
WB: AWB

 
WB: Sunny


 WB: Shade
 

WB: Cloudy
 
PART 2:
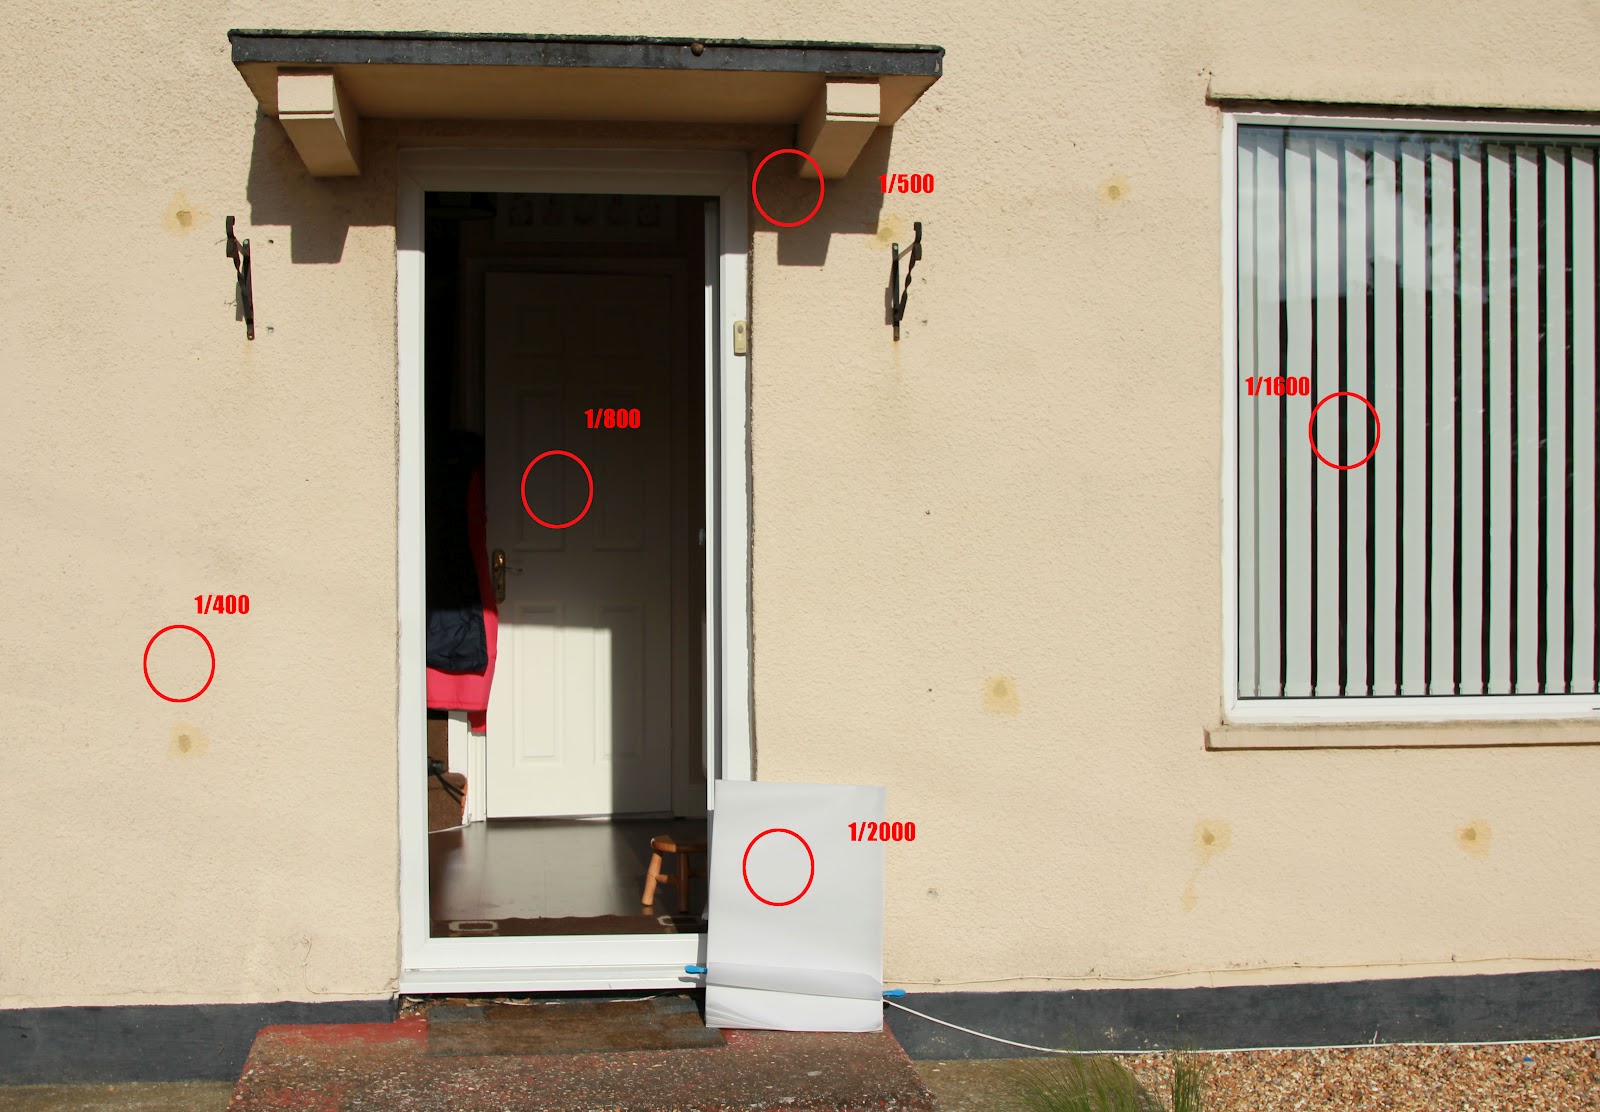
Find and shoot a mixed lighting scene.
 
Indoor/outdoor scene at dusk, in which the interior is lit by incandesent lighting (orangeish) while the exterior, especially under a clear sky is bluish.


WB: AWB

WB: Sunny

WB: Shade

WB: Cloudy


Other Photographers work:

Both images show great creative use of colour casts.

 
A great image showing cold blue colour cast appearance on the rocks.


Joe Cornish: Contours in blue

This is a fantastic piece that shows great light and a colour cast that infact created a dramatic effect.  (this image was initally shot with a filter to balance the colour cast but the photographer went back and took another shot)!


Waite, Cornish & Ward, Working the Light - A landscape photography masterclass, 2006 Bertrams , Pg 115 & 9


Wednesday 26 September 2012

DPP - Exercise - Scene Dynamic Range

DPP - Exercise - Scene Dynamic Range

Take 5 differently lit scenes, find and measure the brightest and darkest areas in each.

Well as it has been so wet and horrible today, I have had to do indoor work - so the 5 scenes that have been captured are from in and around my home.

Hair rollers

 
Image one: taken at 1/4 f6.3 ISO 3200
 
 
Darkest area measured at 0"6 and lightest measured at 1/4
 
Keyboard
 
 
Image 2: 1/15 f10 ISO 800
 
 
Darkest area measured at 1/13 and lightest area 1/125
 
Toys
 
 
Image 3: 1/80 f6.3 ISO 800
 
 
Darkest area measured at 1/50 lightest area measured at 1/160
 
Water cooler
 
 
Image 4: 1/10 f5.6 ISO 1600
 
 
 Darkest area measured at 0"8 and lightest area measured at 1/25
 
Fire
 
 
Image 5: 1/20 f5.6 ISO 1600
 
 
Darkest areas measured at 1/6 and lightest areas measured at 1/25
 
Five very different scenes, mostly taken on a dull wet day due to the weather they were all taken indoors.  I tried to vary the images using only natural daylight and the angle of light on the objects.  It was an interesting lesson that I enjoyed doing and reading about.


Some research...
 
Dynamic Range describes measurable light on a ratio from minimum to maximum ie: lightest white to darkest dark and (black and white respectively).
 
Scenes with varying surfaces of reflectivity ie: black objects and strong reflections might actually have more dynamic range than that of a scene of large incidental light.
 
Ansel Adams a famous Amercian Photographer, better known for his black and white photography.  Adams and Fred Archer developed in the 1930's the Zone system (the way to determine proper exposure, with the guess work).
 
All photographers are different in the way that they work and therefore will see things differently, and that might not be the same as you and me see the same image.


11 symbolic zones
 
A difinitive description of the zones for black and white photography
 
ZoneDescription
0Pure black
INear black, with slight tonality but no texture
IITextured black; the darkest part of the image in which slight detail is recorded
IIIAverage dark materials and low values showing adequate texture
IVAverage dark foliage, dark stone, or landscape shadows
VMiddle gray: clear north sky; dark skin, average weathered wood
VIAverage Caucasian skin; light stone; shadows on snow in sunlit landscapes
VIIVery light skin; shadows in snow with acute side lighting
VIIILightest tone with texture: textured snow
IXSlight tone without texture; glaring snow
XPure white: light sources and specular reflections
 

[online image] available from: http://en.wikipedia.org/wiki/Zone_System#Exposure_zones [accessed 24 September 2012]
 
Books referred to: Michael Free - Mastering Digital Photography


Monday 24 September 2012

DPP - Exercise - Your camera's dynamic range

Well inspite of the rain and strong wind - the sun poked its head out for 5 minutes, just long enough for me to nip outside to the garden with my camera to enable me to complete this exercise.

Exercise: Your camera's dynamic range

Find a scene with a high dynamic range:
  • Bright sunlight
  • at least one brightly reflecting surfaces
  • an area of deep shadow with a dark surface

The front of the house with the door open and white card set beside the door, provides several different areas in the dynamic range.  This was taken at 1/1600 f5.6 ISO 100.


A close up of the white card area 1/2000 f5.6 ISO 100

 
1/1000 f5.6 ISO 100

 
1/160 f5.6 ISO 100
 
 
Here I checked several points within the original image of different surfaces in the picture, they ranged from 1/400 to 1/2000 which is 7 stops difference.  This exercise was completely new to me and not something that I have practised before, so I have learned some interesting new skills here.


DPP - Project - Noise

DPP - Project - Noise

After some serious searching to no avail on the OCA website (which I was getting somewhat frustrated with) I realised that the 'grey texture' image that was apparently on the website under key resources was actually the picture printed on the opposite page - Doh! - However, I do believe that this could perhaps be better labelled!

Well here is a scanned version of the grey texture image.

 
Turkish Dance images.
 
In both grey texture image and turkish dance image - we are talking about detail verus noise.
 
Exercise: Your tolerance for noise
 
Find a situation that fulfills the following:
  •  Daylight indoors (outdoor sunlight would be too harsh to allow high ISO settings - while darker would involve long time exposures)
  • A Combination of sharp detail and textureless areas (such as white walls) with some textureless areas in shadow.
Using a tripod take a series of indentical photos changing the ISO each time.
 
My camera covers the ISO range from 100, 200, 400, 800, 1600, 3200, 6400
 
I set my camera to AV and used my tripod for this exercise.
 
 
ISO 100
 
 
ISO 200
 
 
ISO 400
Slight noise appears, but does not detract from the image
 
 
ISO 800
Here noise is more evident
 
 
ISO 1600
I find that ISO 1600 is where the noise really becomes evident in the image, and becomes more so in the other 2 images ISO 3200 and 6400, where it is very apparent in the image.
 
 
ISO 3200
 
 
ISO 6400
 
The first two images taken at ISO 100 and ISO 200 used slower shutter speeds, so I am not going to use these images to compare.  I have choosen images taken at ISO 400 and ISO 6400 to compare here are the results.
 
 
It is hard to see here, but extemely noticable on my larger screen the levels of noise from the left image taken at ISO 400 to the image on the right taken at ISO 6400.


Noise is probably the most common artifact in digital image capture (artifact being any part of the image that was processed and not from the original scene).  Noise looks similar to graininess and both increase with the ISO sensitivity. 
 

Freeman M, Mastering Digital Photography, Dec 2010 Ilex Press Limited, Pg 568

However they are not the same.  There are 2 ways to deal with noise during shooting and also post production.
 
Noise can be surpressed during shooting images and can also be reduced afterwards in post production using suitable editing software.
 
 
 100% ISO 400
 
 
100% ISO 6400
 
You can clearly see the noise from the 2 screen shots.
 
 
In house camera noise reduction facility would help reduce the noise, but this facility can vary between camera makes with some cameras not having the facility at all.
 
Post production software will also help eliminate the noise, although some require a series of different processes.